2022. 1. 26. 13:48ㆍ카테고리 없음
자연어처리(Natural Language Processing NLP) 컴퓨터를 통해 인간의 언어를 분석 및 처리하는 인공지능의 한 분야
자연어처리 적용 사례 : 문서분류, 키워드추출, 감정분석
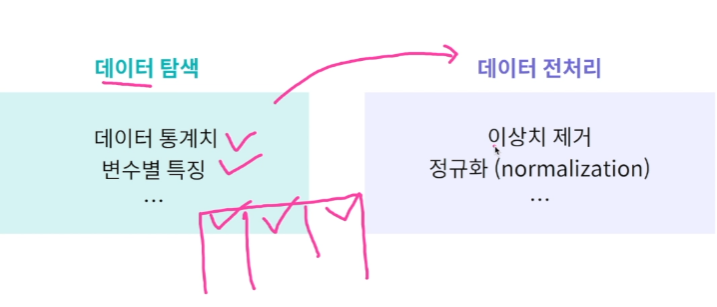
1. 텍스트 전처리

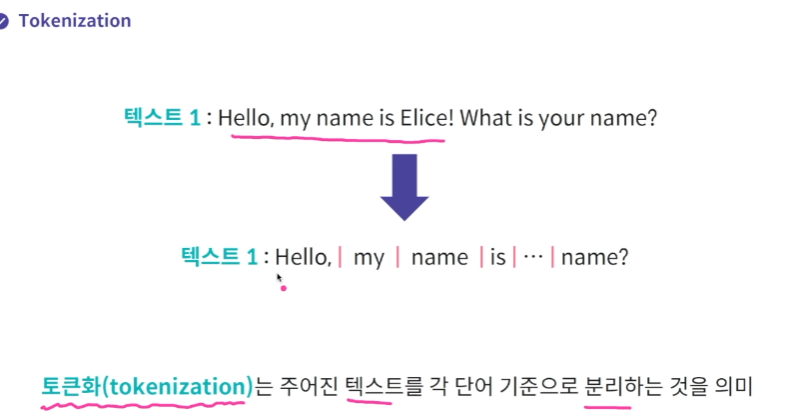
Tokenization
단어 : 3개 단어 개수 및 빈도수 확인

rstrip : 줄바꿈 기호 없애주려고

전처리1 특수기호 제거 : 정규표현식 사용해서 쓰는 문자만 추리기 re

regex.sub() 을 하면 regex로 지정하지 않은 애들은 '' 사라지게 된다.
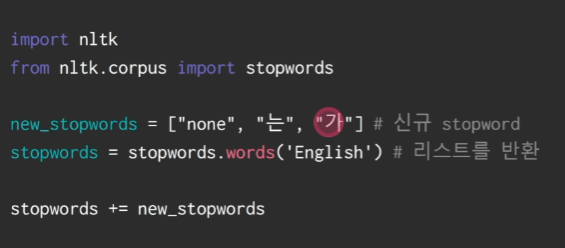
전처리2 Stopword 제거(문법적인.. 크게 의미를 가지고 있지 않은 단어들 제거) nltk 사용하기


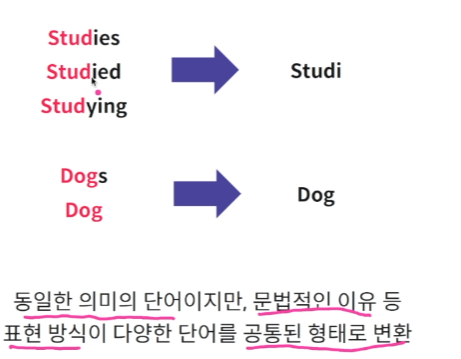
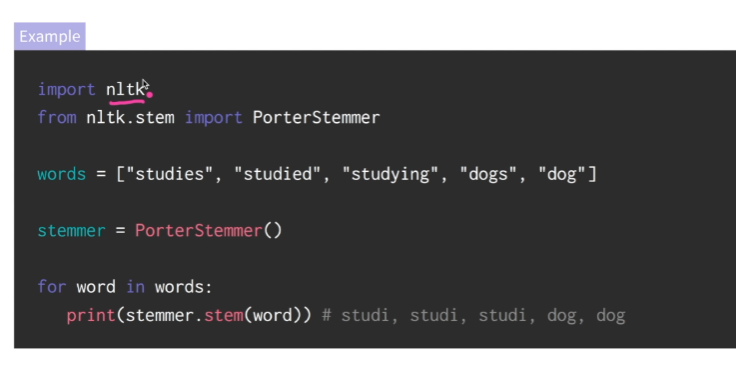
전처리2 : Stemming 동일한 의미의 단어지만 문법으로 표현방식이 다양한 단어를 하나로 합쳐주기
실습 1 데이터 내 단어 빈도수 계산
word_counter = dict()

# 단어가 key, 빈도수가 value로 구성된 딕셔너리 변수를 만드세요.
with open('text.txt', 'r') as f:
    for line in f:
        for word in line.rstrip().split():
            if word not in word_counter:
                word_counter[word]=1
            else:
                word_counter[word]+=1

# print(word_counter)
print(word_counter.values())
print(word_counter.items())
# dict_items([('Bromwell', 4), ('High', 3), ('is', 1972), ('a', 2958), ('cartoon', 6), ('comedy.', 6),...])

# 텍스트 파일에 내 모든 단어의 총 빈도수를 구해보세요.
total = 0

# 텍스트 파일 내 100회 이상 발생하는 단어를 리스트 형태로 저장하세요.
up_five = list()

for word, freq in word_counter.items():
    total += freq
    if freq >= 100:
        up_five.append(word)


# print(total)
print(up_five)
실습2 텍스트 전처리를 통한 데이터 탐색
import re

word_counter = dict()
regex = re.compile('[^a-zA-Z]')

# 텍스트 파일을 소문자로 변환 및 숫자 및 특수기호를 제거한 딕셔너리를 만드세요.
with open('text.txt', 'r') as f: # 실습 1 과 동일한 방식으로 `IMDB dataset`을 불러옵니다.
    for line in f:
        words = line.rstrip().lower().split() # \n제거, 소문자화
        for word in words:
            processed_word = regex.sub('', word) # a~zA~Z아닌 것 뺴기
            if processed_word not in word_counter:
                word_counter[processed_word]=1
            else:
                word_counter[processed_word]+=1


# 단어 "the"의 빈도수를 확인해 보세요.
count = word_counter['the']

print(count)
실습3 NLTK를 통한 stopwords 및 stemming 처리
from nltk.corpus import stopwords
from nltk.tokenize import word_tokenize
from nltk.stem import PorterStemmer

test_sentences = [
    "i have looked forward to seeing this since i first saw it amoungst her work",
    "this is a superb movie suitable for all but the very youngest",
    "i first saw this movie when I was a little kid and fell in love with it at once",
    "i am sooo tired but the show must go on",
]

# 영어 stopword를 저장하세요.
stopwords = stopwords.words('english')

print(stopwords)

# stopword를 추가하고 업데이트된 stopword를 저장하세요.
new_keywords = ['noone', 'sooo', 'thereafter', 'beyond', 'amoungst', 'among']
updated_stopwords = stopwords + new_keywords

print(updated_stopwords)

# 업데이트된 stopword로 test_sentences를 전처리하고 tokenized_word에 저장하세요.
tokenized_word = []

for sentence in test_sentences:
    tokens = word_tokenize(sentence)
    print(tokens) # ['i', 'have', 'looked', 'forward', 'to', 'seeing', 'this', 'since', 'i', 'first', 'saw', 'it', 'amoungst', 'her', 'work'] 이런게 네번
    new_sent = []
    for token in tokens:
        # print(token)
        if token not in updated_stopwords:
            new_sent.append(token)
    tokenized_word.append(new_sent)


print(tokenized_word) # [['looked', 'forward', 'seeing', 'since', 'first', 'saw', 'work'], ['superb', 'movie', 'suitable', 'youngest'], ['first', 'saw', 'movie', 'I', 'little', 'kid', 'fell', 'love'], ['tired', 'show', 'must', 'go']]

# stemming을 해보세요.
stemmed_sent = []
stemmer = PorterStemmer()

for word in tokenized_word[0]:
    stemmed_sent.append(stemmer.stem(word)) # stemming 적용

print(stemmed_sent) # ['look', 'forward', 'see', 'sinc', 'first', 'saw', 'work']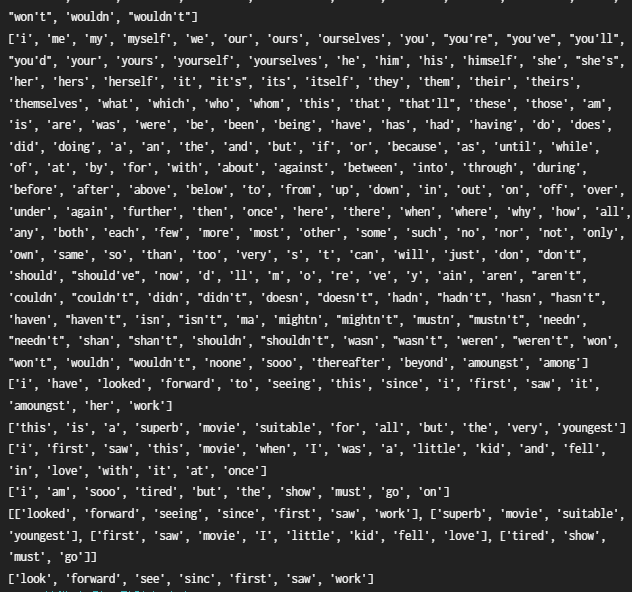
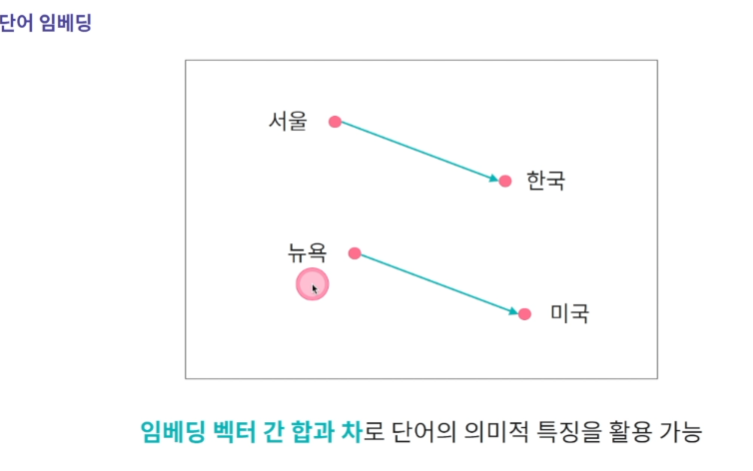
단어 임베딩
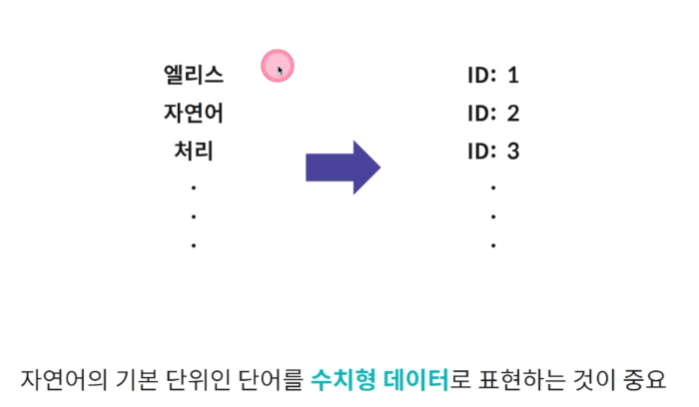
컴퓨터는 모든 데이터를 0,1로 저장을 해야한다. 텍스트를 0,1로 만들어야한다
즉 숫자로 매핑을 해야한다. 자연어의 기본 단위인 단어를 수치형 데이터로 표현하는 게 중요하다.
단어 임베딩 : 연속형 벡터로 표현하는 방법.

그럼 저 숫자들은 어떻게 정하냐?
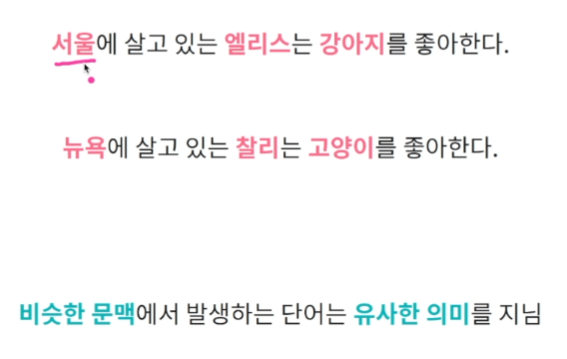
-> 유사한 단어의 임베딩 벡터는 벡터공간에서 인접한 공간에 위치하도록 숫자값을 정한다

단어를 임베딩 벡터로 표현한다면 장점 : 벡터간 합과 차로 단어의 의미적 특징을 나타낼 수 있다.
임베딩의 목적 : 단어를 벡터로 표현하는 것.
word2vec

word2vec : 주어진 문맥에서 발생하는 단어를 예측(엘리스는 을 예측)
각 단어의 벡터는 해당 단어가 입력으로 주어졌을 때 계산되는 hidden layer의 값을 사용
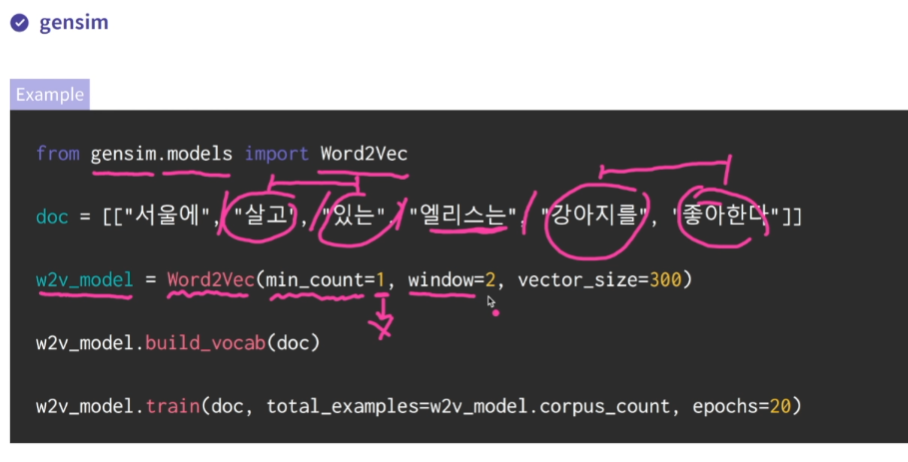
window : 앞뒤 몇 단어(window 2면 살고 있는 / 강아지를 좋아한다)를 사용해서 vector를 정할 것이냐
학습 후 다음과 같은 것들을 해볼 수 있음.

실습 4 word2vec으로 단어유사도 측정
import pandas as pd
from gensim.models import Word2Vec

def load_data(filepath):
    data = pd.read_csv(filepath, delimiter=';', header=None, names=['sentence','emotion'])
    data = data['sentence']

    gensim_input = []
    for text in data:
        gensim_input.append(text.rstrip().split())
    return gensim_input

input_data = load_data("emotions_train.txt")

# word2vec 모델을 학습하세요.
w2v_model = Word2Vec(window=2, vector_size= 300 )
w2v_model.build_vocab(input_data) # 원하는 문장 넣기
w2v_model.train(input_data, total_examples=w2v_model.corpus_count, epochs=20) # total_examples = 모델.corpus_count하면 알아서 세서 넣어줌.

# happy와 유사한 단어를 확인하세요.(임베딩벡터가 벡터공간에서 가까이 있는 단어)
similar_happy = w2v_model.wv.most_similar('happy')
print(similar_happy)
# [('excited', 0.6821942925453186), ('satisfied', 0.6671132445335388), ('thrilled', 0.633065402507782), ('blessed', 0.6251223087310791),

# sad와 유사한 단어를 확인하세요.
similar_sad = w2v_model.wv.most_similar('sad')
print(similar_sad)
# [('unhappy', 0.7429677844047546), ('lonely', 0.740343451499939), ('upset', 0.7344641089439392),

# 단어 good과 bad의 임베딩 벡터 간 유사도를 확인하세요.
similar_good_bad = w2v_model.wv.similarity('good','bad')
print(similar_good_bad) # 0.6914232

# 단어 sad과 lonely의 임베딩 벡터 간 유사도를 확인하세요.
similar_sad_lonely = w2v_model.wv.similarity('sad','lonely')
print(similar_sad_lonely) # 0.74034345

# happy의 임베딩 벡터를 확인하세요.
wv_happy = w2v_model.wv['happy']
print(wv_happy) # [-5.26013672e-01  1.14806101e-01  1.37844205e-...
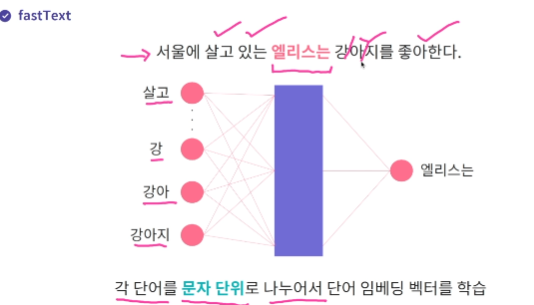
fastText
word2vec 의 한계점 학습데이터 내 존재하지 않았던 단어 벡터는 생성할 수 없다(미등록 단어 문제, out of vocabulary)
-> fastText는 각 단어를 문자단위로 나누어서 임베딩 벡터를 학습한다

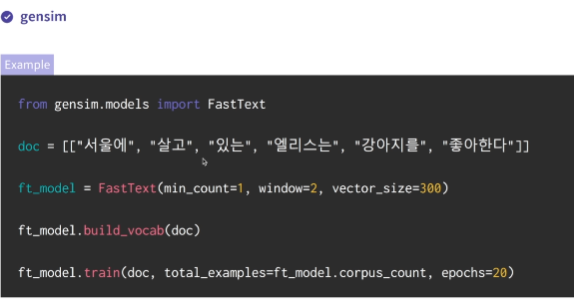

from gensim.models import FastText
import pandas as pd

# Emotions dataset for NLP 데이터셋을 불러오는 load_data() 함수입니다.
def load_data(filepath):
    data = pd.read_csv(filepath, delimiter=';', header=None, names=['sentence','emotion'])
    data = data['sentence']

    gensim_input = []
    for text in data:
        gensim_input.append(text.rstrip().split())

    return gensim_input

input_data = load_data("emotions_train.txt")

# fastText 모델을 학습하세요.
ft_model= FastText(min_count=10, window=3, vector_size=300) # min_count=단어 최소 발생빈도
ft_model.build_vocab(input_data) #단어 등록
ft_model.train(input_data, total_examples=ft_model.corpus_count, epochs=10)

# day와 유사한 단어 10개를 확인하세요.
similar_day = ft_model.wv.most_similar('day')
print(similar_day)
# [('week', 0.9321630001068115), ('monday', 0.9192879796028137), ('weeks', 0.9105921387672424), ('weekend', 0.904663622379303), ('days', 0.9041846394538879),

# night와 유사한 단어 10개를 확인하세요.
similar_night = ft_model.wv.most_similar('night')
print(similar_night)
# [('nights', 0.9343169331550598), ('flight', 0.8981904983520508), ('tonight', 0.8974018096923828),

# elllllllice의 임베딩 벡터를 확인하세요.
wv_elice = ft_model.wv['elllllllice']
print(wv_elice)
# [-2.83587747e-03 -3.80135067e-02 -3.83718163e..